There’s nothing quite as frustrating for a musician as sitting down to play your beloved digital piano, only for it to remain stubbornly silent, refusing to power on. This common issue can spark immediate panic, imagining costly repairs or even a replacement. However, before you despair, many “no power” situations are surprisingly simple to diagnose and resolve yourself. With a few systematic checks and a bit of patience, you can often get your digital piano back up and running fast. This comprehensive guide will walk you through the most common reasons why your digital piano might not be turning on and provide clear, actionable steps to troubleshoot and fix the problem.
Why Won’t Your Digital Piano Turn On? Common Culprits
When your digital piano refuses to light up, the problem usually stems from one of a few key areas. Understanding these potential culprits is the first step toward a quick resolution.
Faulty Power Adapter or Cable
|
Our Picks for the Best Digital Piano in 2026
As an Amazon Associate I earn from qualifying purchases.
|
||
| Num | Product | Action |
|---|---|---|
| 1 | RockJam RJ761 61 Key Keyboard Piano with Keyboard Bench, Digital Piano Stool, Sustain Pedal, Headphones & Lessons |

|
| 2 | Rhymo Folding Piano Keyboard, 61 Keys Sensitive Electric Piano, Weighted Portable Electric Keyboards with Bluetooth MIDI, Digital Foldable Keyboard for Beginner (Black) |
|
| 3 | Yamaha 88-Key Digital Piano with Weighted Keys, Compact Design, Bluetooth, Keyboard, Music Rest, Sustain Foot Switch, and Built-in Speakers for Home Practice or Travel P145BT |
|
| 4 | Yamaha P225 88-Key Digital Piano with Weighted Keys, Portable Design, Keyboard, Music Rest, Sustain Foot Switch, and Built-In Speakers, Black (P225B) |
|
| 5 | 61 keys keyboard piano, Electronic Digital Piano with Built-In Speaker Microphone, Sheet Stand and Power Supply, Portable piano Keyboard Gift Teaching for Beginners |
|
| 6 | Yamaha 88-Key Weighted Portable Digital Piano Keyboard with Music Rest, Sustain Foot Switch, Built-in Speakers, USB Connectivity, Black (P45B) |
|
| 7 | Portable Piano Keyboard, Semi-Weighted Folding Digital Piano 88 Key, Full Size, Wood Grain, Electric Piano Keyboard w/MIDI Bluetooth, Suitable for Adult, Toddler |
|
| 8 | STRICH 88 Key Digital Piano Foldable Full Size Electric Keyboard with Semi-Weighted Sensitive Keys, Portable Electric Piano Set for Beginner, Bundle with Sustain Pedal, Headphones, Music Rest, SEP-88F |
|
| 9 | Alesis Melody 61 MK4 Keyboard Piano for Beginners with 61 Keys, Speakers, Stand, Bench, Headphones, Tablet/Sheet Music Stand, 300 Sounds and Music Lessons |
|
| 10 | Roland FP-10 | Compact 88-Note Digital Piano | SuperNATURAL Piano Tones | Authentic Acoustic Feel Keyboard | Great for Beginners & Experienced Players | Bluetooth & MIDI Connectivity |
|
The power adapter and its cable are, by far, the most frequent points of failure. These components endure constant plugging, unplugging, bending, and sometimes even accidental tugs, leading to internal wire breaks, damaged connectors, or adapter failure. If the adapter isn’t supplying the correct voltage or current, or if the cable has an intermittent connection, your digital piano won’t receive the necessary power to activate.
Problematic Power Outlet or Surge Protector
Sometimes, the issue isn’t with your digital piano at all, but with its power source. A dead wall outlet, a tripped circuit breaker, or a faulty surge protector can prevent any device from powering on. It’s an often-overlooked area that’s usually very easy to check.
Internal Component Issues
While less common for a sudden “no power” situation, internal component failures can also be the cause. This could include a malfunctioning power switch, a damaged DC power input jack (where the adapter plugs in), or a more complex problem with the instrument’s internal power distribution board or main circuit board. These issues typically require professional repair.
Battery-Related Problems (For Portable Models)
If you own a portable digital piano that relies on batteries, a failure to turn on could simply mean depleted, improperly inserted, or corroded batteries. Even models that use an AC adapter might have backup batteries that, if faulty, could interfere with normal operation.
Step-by-Step Troubleshooting: Your Quick Fix Guide
Let’s dive into practical steps you can take to diagnose and potentially fix your digital piano when it won’t power on. Always prioritize safety, and if at any point you feel uncomfortable or out of your depth, it’s best to consult a professional.
1. Check the Power Connection and Outlet
Start with the simplest possibilities. Ensure everything is securely connected and that your power source is active.
- Verify All Connections: Unplug the power cable from both the digital piano and the wall outlet (or surge protector). Inspect both ends of the cable for any obvious damage like bent pins, frayed wires, or loose components. Then, firmly plug the cable back into the piano’s power input and the electrical outlet. A loose connection is a surprisingly common reason for power failure.
- Test the Outlet: Plug another working electronic device, such as a lamp or a phone charger, into the same wall outlet or surge protector that your digital piano typically uses. If the other device also fails to power on, the problem lies with the outlet or surge protector, not the piano. Try a different outlet in your home, ensuring it’s on a different circuit if possible. If using a surge protector, check its reset button or try plugging the piano directly into a wall outlet to bypass it.
- Inspect the Power Cable Itself: Visually check the entire length of the power cord for any cuts, kinks, or signs of wear. Even subtle damage can disrupt the flow of electricity.
2. Perform a “Soft Reset”
Sometimes, electronic devices can experience minor software glitches or residual power issues that prevent them from starting. A soft reset can clear these without affecting your settings.
- Unplug and Hold: Disconnect the power adapter from both the digital piano and the wall outlet. Now, press and hold the digital piano’s power button for about 30 seconds. This action helps to drain any residual electrical charge stored within the instrument’s capacitors. After holding, release the button, plug everything back in securely, and attempt to turn the piano on again.
3. Examine the Power Adapter
The power adapter is often the weak link. A thorough inspection and testing can pinpoint if it’s the source of your problems.
- Visual and Sensory Inspection: Feel the power adapter brick for excessive heat when it’s plugged in. Listen for any unusual buzzing or crackling sounds. Look for discoloration, swelling, or any physical damage to the adapter’s casing or where the cable connects to the brick. These are all signs of a failing adapter.
- Testing with a Multimeter: For those comfortable with basic electronics, a digital multimeter can confirm if your adapter is outputting the correct voltage.
- Set the Multimeter: Set your multimeter to measure DC voltage (V with a straight line, often labeled “DCV” or “V–“). Choose a range slightly higher than your adapter’s output voltage (e.g., if your adapter is 12V, set the multimeter to 20V DC).
- Check Adapter Specs: Locate the small label on your power adapter. It will state the “Output” voltage (e.g., 12V DC) and current (e.g., 1.5A). It will also show a polarity diagram, usually a circle with a plus sign (+) in the center and a minus sign (-) on the outside, or vice versa. Digital pianos typically use a “center-positive” configuration.
- Test the Output: With the adapter plugged into an active outlet, carefully touch the multimeter’s positive probe (red) to the inside of the adapter’s barrel connector and the negative probe (black) to the outside. The reading on your multimeter should be close to the stated output voltage on the adapter’s label, often slightly higher (e.g., 12V adapter might read 12.5-13V when unloaded). If the reading is zero, significantly lower, or fluctuating erratically, your adapter is likely faulty. Ensure you check the polarity—reversing the probes should give you a negative voltage reading if the adapter is working.
- Replacement Adapter Considerations: If your adapter is faulty, you’ll need a replacement. It’s crucial to purchase one that precisely matches the voltage (V), polarity, and has an equal or higher amperage (A) rating as your original adapter. Using an adapter with incorrect voltage or polarity can permanently damage your digital piano. [cite: 3 (testing), 2, 4 (specs)]
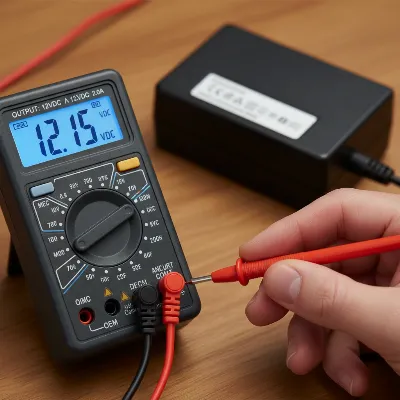 Testing a digital piano power adapter with a digital multimeter to check voltage and polarity.
4. Address Battery Issues (Portable Pianos)
For portable digital pianos that can run on batteries, inspect this power source carefully.
- Check and Replace Batteries: Open the battery compartment. Look for any signs of corrosion (a powdery white or green substance) on the battery terminals or the batteries themselves. Remove and reinsert the batteries, ensuring they are correctly oriented according to the polarity markings. If the batteries are old or have been in storage, replace them with a fresh set of high-quality alkaline or rechargeable batteries specified for musical instruments.
- Remove Batteries When Not in Use: If you primarily use your portable piano with the AC adapter, it’s good practice to remove the batteries when not in use for extended periods to prevent leakage and corrosion.
5. Clean Power Ports
Dust and debris can accumulate in the power input jack, preventing a good connection.
- Use Compressed Air: With the piano unplugged, use a can of compressed air to gently blow out any dust or lint from the digital piano’s power input jack. Avoid using sharp objects, which could damage the internal contacts.
6. Check Voltage Selector (If Applicable)
Some older or international models of digital pianos may have a voltage selector switch (e.g., 110V/220V).
- Match Local Supply: Ensure this switch is set to match your local power supply voltage. An incorrect setting will prevent the piano from powering on or could damage it. Most modern pianos automatically adjust, but it’s worth a quick check if present.
When It’s Time for Professional Help
If you’ve meticulously followed all the troubleshooting steps above and your digital piano still won’t turn on, or if you encounter specific warning signs, it’s time to call in a qualified technician.
- Persistent Issues: If the piano remains unresponsive after checking all external power sources and performing a soft reset, the problem is likely internal.
- Signs of Internal Damage: Any burning smells, visible smoke, flickering lights, or odd noises coming from within the piano are critical indicators of a serious internal electrical fault. Immediately unplug the instrument and do not attempt to use it.
- Suspected Component Failure: Issues like a broken power switch that feels loose or stuck, a visibly damaged DC power input jack that wiggles excessively, or a suspected main board failure require specialized tools and expertise for diagnosis and repair. Attempting to fix these without proper knowledge can lead to further damage or electric shock.
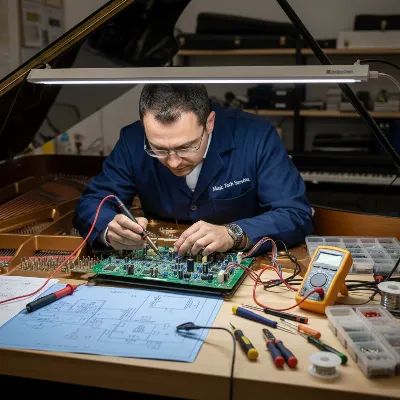 A professional technician repairing the internal components of a digital piano on a workbench.
Preventive Maintenance for Digital Pianos
To minimize the chances of your digital piano suddenly refusing to power on, incorporate these simple maintenance practices into your routine:
- Utilize Surge Protectors: Always plug your digital piano into a high-quality surge protector. This protects your instrument from sudden voltage spikes and power fluctuations that can damage sensitive electronics.
- Regular Cable Inspections: Periodically inspect your power cable and adapter for any signs of wear and tear, especially near the connectors. Replace them at the first sign of damage.
- Proper Battery Care: For portable models, remove batteries if the piano won’t be used for a long time, store them at room temperature, and use high-quality batteries to prevent leakage and corrosion.
- Activate Power-Saving Features: Many digital pianos have energy-saving modes or auto-off functions. Utilizing these can extend the lifespan of internal components by reducing unnecessary power draw.
Conclusion
A digital piano that won’t turn on can be a daunting problem, but it’s often a fixable one. By systematically checking your power connections, testing your outlet, performing a soft reset, and thoroughly examining your power adapter, you can resolve many common issues quickly and safely. Remember to prioritize safety and never hesitate to seek professional help when the problem appears to be internal or beyond your comfort level. With proper care and diligent troubleshooting, you can ensure your digital piano remains a reliable source of musical inspiration for years to come. What’s the most unexpected way you’ve brought an electronic device back to life?
Frequently Asked Questions
Can I use any power adapter for my digital piano?
No, it is crucial to use a power adapter that precisely matches your digital piano’s required voltage (V), polarity (center-positive or center-negative), and has an equal or higher amperage (A) rating than the original. Using an incorrect adapter can cause damage.
How do I know if my digital piano’s power adapter is faulty?
Look for visual signs like physical damage, discoloration, or swelling. Listen for unusual buzzing. If you have a multimeter, you can test its output voltage; a faulty adapter will show zero, a significantly low reading, or unstable voltage.
What does a “soft reset” do for a digital piano?
A soft reset, performed by unplugging the piano and holding the power button for about 30 seconds, drains residual electrical charge from internal components. This can clear minor software glitches or power-related issues that might prevent the piano from turning on.
My digital piano turns on but then quickly shuts off. What could be wrong?
This issue is different from a complete power failure. Common causes include auto power-off settings, overheating due to poor ventilation, or internal component problems like a failing main board or power supply instability. Check your manual for auto-off settings first.
Is it safe to try fixing internal issues myself?
Generally, no. Unless you have formal training and experience in electronics repair, attempting to fix internal issues in a Digital Piano can be dangerous due to the risk of electric shock and can cause further, irreparable damage to the instrument. It is always best to consult a professional technician for internal repairs.