Building a custom digital piano stand provides unparalleled stability, perfect ergonomic alignment, and superior aesthetics compared to generic X-stands or Z-stands. This DIY approach allows you to tailor the stand precisely to your instrument’s dimensions, your playing posture, and your home décor, often at a lower cost than high-end furniture-style stands. A custom stand ensures your digital piano is rock-solid during vigorous playing and integrates seamlessly into your musical space.
Why Build a Custom Digital Piano Stand?
Digital pianos, revered for their versatility and compact design compared to acoustic counterparts, deserve a stable and supportive home. Many musicians start with portable X-stands or Z-stands, which, while convenient for transport, often introduce wobbling, limit legroom, and lack the integrated aesthetics of a dedicated furniture piece. A custom-built stand offers a multitude of advantages that enhance both functionality and the visual appeal of your setup.
Firstly, a DIY stand provides unparalleled stability. Unlike lighter, often flimsy generic options, a custom wooden stand ensures your instrument remains rock-solid, even during vigorous playing. This stability is crucial for developing proper technique and truly immersing yourself in your music. Secondly, you gain perfect ergonomic alignment. Off-the-shelf stands may not position your keyboard at the ideal height, leading to discomfort or poor posture over long practice sessions. Building your own allows you to precisely match the stand’s height to your body and playing posture, ensuring your elbows are comfortably level with the keys.
Beyond the practical benefits, a custom stand offers superior aesthetics and integration. You can choose materials, finishes, and designs that perfectly complement your home’s interior, turning your digital piano into a sophisticated piece of furniture rather than just equipment. This personal touch fosters a more inspiring and enjoyable playing environment. Building your own can be surprisingly cost-effective compared to purchasing high-end, furniture-style stands, especially if you have basic woodworking tools. Finally, a DIY approach allows for unique customizations, such as integrated shelves for speakers, sheet music, or accessories, and thoughtful cable management solutions to keep your space tidy and organized.
Planning Your Custom Digital Piano Stand
The success of your DIY digital piano stand hinges on meticulous planning. Before you make a single cut, take the time to conceptualize, measure, and sketch your design.
The first critical step is to accurately measure your digital piano. Note its exact width, depth, and height. Pay special attention to any protrusions on the underside, like rubber feet or mounting points, that might affect how it rests on the stand. If your digital piano includes a separate pedal unit, measure its dimensions as well, ensuring your stand design provides adequate space and stability for it. that the stand needs to accommodate the piano’s footprint, not just its playing surface.
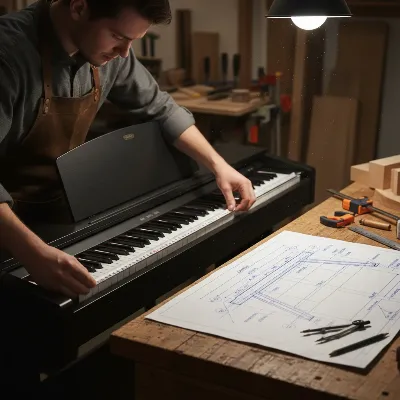 A person meticulously measuring a digital piano with a tape measure, with a sketch of a stand design and various dimensions noted on a blueprint paper. Focus on precision and planning.
Next, consider ergonomics for optimal play. The generally accepted ergonomic principle for piano playing is that your forearms should be roughly parallel to the floor, with your elbows forming a comfortable right angle when your fingers are on the keys. This means the top surface of your digital piano’s white keys should be at a height that allows for this posture. Sit at your piano (perhaps on a temporary setup or existing stand) and determine your ideal playing height. Factor in the height of your piano bench or chair. For most adults, this key height typically falls between 28 to 30 inches (71-76 cm) from the floor, but it’s highly individual.
When it comes to design principles, prioritize stability. A wider base and cross-bracing will significantly reduce wobble. Think about the aesthetic: do you want a sleek, minimalist look, a rustic farmhouse style, or something more traditional? Consider how the stand will integrate with your room’s décor. Also, plan for cable management. Incorporating discreet channels, holes, or a recessed area for power cords and audio cables will keep your setup clean and professional.
Finally, sketch your design. A simple hand-drawn diagram from multiple angles (front, side, top) can help visualize the structure and identify potential issues. Label all dimensions clearly. This drawing will serve as your blueprint, guiding your material cuts and assembly. If you plan for additional features like shelves for speakers or a pull-out tray for a laptop, incorporate these into your sketch with their respective dimensions.
Tools and Materials Required
Building a custom digital piano stand requires a selection of woodworking tools and materials. The specific items may vary slightly depending on your chosen design and complexity, but here’s a comprehensive list to get you started.
Wood Selection:
- Pine: An excellent choice for beginners and budget-conscious builders. It’s affordable, widely available, and relatively easy to cut, drill, and finish. Laminated pine panels are often used for shelves and tabletops, while pine boards (e.g., 2x4s, 2x2s) are great for structural elements like legs and braces.
- Plywood or MDF (Medium-Density Fiberboard): Good for flat panels, sides, or shelves. MDF is very budget-friendly and smooth, ideal for painting, but less durable and water-resistant than plywood. Plywood offers more strength and stability.
- Hardwoods (Oak, Maple, Walnut): For a more premium, durable, and aesthetically rich stand. Hardwoods are more expensive and harder to work with, requiring sharper tools and more careful joinery, but they yield beautiful, long-lasting results.
Hardware:
- Wood Screws: Essential for most joinery. Choose appropriate lengths and gauges for the thickness of your wood. Consider self-tapping screws for easier insertion.
- Machine Screws and T-nuts: Useful for creating a stand that can be disassembled for transport or storage, offering a strong, secure, and repeatable connection.
- Dowels and Wood Glue: For strong, concealed joints. Dowels add significant structural integrity when combined with glue.
- Corner Brackets: (Optional) Can add extra reinforcement to corners, especially if you’re concerned about stability.
- Drawer Slides and Hinges: (For advanced designs) If you plan a pull-out tray for a laptop or a flip-top desk design to conceal the piano.
Essential Tools:
- Measuring Tools: Tape measure, carpenter’s square, pencil. Precision is key.
- Cutting Tools:
- Miter Saw: Excellent for precise crosscuts (cutting wood to length).
- Circular Saw: Versatile for cutting larger sheets of plywood or making long rips.
- Table Saw: (Optional, but highly recommended for accuracy) Ideal for making precise, straight rip cuts (cutting wood to width).
- Jigsaw: Useful for cutting curves or intricate shapes.
- Drilling Tools:
- Cordless Drill/Driver: Indispensable for pre-drilling holes and driving screws.
- Drill Bits: A variety of sizes for pilot holes and countersinking.
- Dowel Jig: (If using dowels) Ensures accurate alignment of dowel holes.
- Pocket Hole Jig (e.g., Kreg Jig): (Optional, but very useful) Creates strong, hidden joints.
- Clamping Tools: Bar clamps or pipe clamps are essential for holding pieces together securely while glue dries or while driving screws.
- Sanding Tools: Sandpaper (various grits), orbital sander or sanding block, for smoothing surfaces before finishing.
- Safety Gear: Safety glasses, ear protection, dust mask. Always prioritize safety in your workshop.
Step-by-Step Guide to Building Your Stand
With your design finalized and materials gathered, it’s time to bring your custom digital piano stand to life. These steps outline a general approach; adapt them to your specific design.
Step 1: Gather & Cut MaterialsBased on your detailed sketch and measurements, precisely mark all cuts on your chosen lumber. Measure twice, cut once! Use your miter saw for crosscuts and a circular or table saw for rip cuts. Label each cut piece with its purpose (e.g., “Leg A,” “Top Support”) to avoid confusion during assembly.Ensure all edges are clean and free of splinters after cutting.
Step 2: Assemble Side Panels (Leg Assemblies)Typically, a digital piano stand has two main side panels that form the legs and vertical support. Lay out the pieces for one side panel. This usually involves two vertical legs connected by one or more horizontal cross-supports.
- Joinery Method:
- Screws: Pre-drill pilot holes to prevent wood splitting, then drive wood screws. You can countersink screw heads for a flush finish that can be filled later.
- Pocket Holes (Kreg Jig): Drill pocket holes on the inside surfaces of the horizontal supports. Apply wood glue, clamp the pieces, and then drive pocket hole screws. This creates strong, hidden joints.
- Dowels & Glue: Drill precise dowel holes on the mating surfaces of your pieces. Apply wood glue, insert dowels, and clamp tightly until the glue dries. This is a very strong and clean method.Apply wood glue to all mating surfaces before fastening for added strength. Clamp the assembled side panel securely to ensure squareness while the glue dries. Repeat this process for the second side panel.
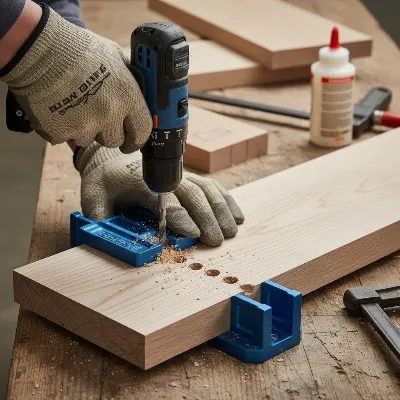 Close-up of a person using a Kreg Jig to drill pocket holes into wooden pieces for a digital piano stand leg assembly, with wood glue and clamps visible.
Step 3: Connect Side Panels with Horizontal SupportsOnce your two side panels are assembled and stable, you’ll connect them with longer horizontal supports to form the main frame of the stand. These supports will determine the overall width and depth of your stand and provide the critical platform for your digital piano.
- Attach Front and Back Horizontal Supports: These pieces run horizontally between the two side panels, typically forming the top frame where the piano will rest. Use your chosen joinery method (screws, pocket holes, or dowels and glue) to securely attach these supports to the inside or outside of the side panels. Ensure the entire structure is square and level.
- Add Bottom Horizontal Support (Optional but Recommended): A horizontal brace near the bottom of the stand, running between the two side panels, will significantly increase stability and rigidity, especially if you’re using lighter wood. This also provides an ideal spot for organizing cables later.
Step 4: Create the Piano PlatformThe piano needs a secure, flat surface to rest on. This can be achieved in several ways:
- Integrated Top Frame: If your horizontal supports in Step 3 already form a solid frame at the correct height, your piano can rest directly on these.
- Separate Top Panel: Cut a piece of plywood or a laminated panel to the exact dimensions of your piano’s base. Secure this panel to the top horizontal supports using screws (drilling from the underside for a cleaner look) or corner brackets. Ensure this platform is perfectly level and sturdy.
- Recessed Platform: For a more integrated look, you might design the top frame with a slight lip, allowing the piano to sit “into” the stand, preventing it from sliding.
Step 5: Add Stability & Features
- Reinforcements: Review your stand for any potential weak points. Add gussets or triangular bracing in corners if you notice any flex.
- Additional Shelves: If your design includes shelves for speakers, a laptop, or sheet music, now is the time to add them. Use cleats, dowels, or screws to secure these shelves within the frame.
- Cable Management: Drill discrete holes for cables to pass through or create cable channels along the back of the stand.
- Feet: Add felt pads or small rubber feet to the bottom of the legs to protect your floor and prevent the stand from sliding.
Finishing Touches
The finishing touches improve your functional stand into a polished piece of furniture. This stage allows you to truly personalize its appearance.
First, sanding is paramount for a smooth, professional finish. Start with a medium-grit sandpaper (e.g., 100-120 grit) to remove any pencil marks, small imperfections, or rough spots. Then, progress to a finer grit (e.g., 180-220 grit) for a silky smooth surface. For the best results, sand with the grain of the wood. Remove all sanding dust with a tack cloth or vacuum before moving to the next step.
Once sanded, you can stain, paint, or apply a clear coat.
- Staining: If you want to highlight the natural wood grain, choose a wood stain. Test the stain on a scrap piece of wood first to ensure you achieve the desired color. Apply the stain evenly with a cloth or brush, wiping off any excess according to the product instructions.
- Painting: For a solid color, apply a wood primer first, especially if using pine or MDF. Then, apply several thin coats of your chosen paint, allowing adequate drying time between coats. Lightly sand between coats for a smoother finish.
- Clear Coat: Whether stained or left natural, a clear protective finish (like polyurethane, lacquer, or Danish oil) is essential for durability. It protects the wood from moisture, scratches, and wear. Apply multiple thin coats as per the product instructions, sanding lightly with very fine-grit sandpaper (e.g., 320-400 grit) between coats for a perfectly smooth, hard-wearing surface.
Finally, for screw holes that you want to hide, fill them with wood putty that matches your wood or paint color. Once dry, sand the putty flush with the surface before applying your chosen finish. If your design involves machine screws and T-nuts for disassembly, ensure these are tightly fastened and look neat.
Maintenance for Your Custom Stand
Maintaining your custom digital piano stand will ensure its longevity and continued aesthetic appeal. While a wooden stand is generally robust, a little care goes a long way.
Regularly clean your stand with a soft, dry cloth to remove dust. For tougher grime, a slightly damp cloth with a mild wood cleaner (if your finish allows) can be used, but always wipe dry immediately to prevent moisture damage. Avoid harsh chemical cleaners, as these can strip or damage the finish.
Periodically, check all fasteners. Over time, screws or bolts can loosen due to vibrations or changes in humidity. Use a screwdriver or wrench to gently tighten any loose connections. This is particularly important for maintaining the stand’s stability and preventing wobbling. If you used wood glue and dowels, these joints are typically very strong and require less attention.
Protect the wood from extreme temperature fluctuations and humidity, which can cause wood to warp or crack. Position your stand away from direct sunlight, heating vents, or air conditioning units. Consider using a humidifier or dehumidifier in your playing space to maintain a stable environment, especially if you live in an area with significant climate swings. If your stand will be in a high-traffic area, consider applying a fresh coat of protective finish every few years to guard against wear and tear.
Conclusion
Building a custom digital piano stand is more than just a woodworking project; it’s an investment in your musical passion and your home environment. By taking the time to design and construct a stand that perfectly meets your ergonomic needs, aesthetic preferences, and the specific dimensions of your instrument, you create a dedicated playing space that inspires creativity and comfort. Say goodbye to wobbly, ill-fitting generic stands and embrace the stability, elegance, and personalized functionality of a stand crafted just for you. This DIY endeavor not only results in a superior setup but also offers the deep satisfaction of creating something beautiful and functional with your own hands. So, grab your tools, unleash your creativity, and improve your digital piano experience to new heights!
Frequently Asked Questions
What are the main benefits of a DIY digital piano stand over a store-bought one?
|
Our Picks for the Best Digital Piano in 2026
As an Amazon Associate I earn from qualifying purchases.
|
||
| Num | Product | Action |
|---|---|---|
| 1 | Alesis Melody 61 MK4 Keyboard Piano for Beginners with 61 Keys, Speakers, Stand, Bench, Headphones, Tablet/Sheet Music Stand, 300 Sounds and Music Lessons |

|
| 2 | RockJam RJ761 61 Key Keyboard Piano with Keyboard Bench, Digital Piano Stool, Sustain Pedal, Headphones & Lessons |
|
| 3 | Rhymo Folding Piano Keyboard, 61 Keys Sensitive Electric Piano, Weighted Portable Electric Keyboards with Bluetooth MIDI, Digital Foldable Keyboard for Beginner (Black) |
|
| 4 | Yamaha 88-Key Digital Piano with Weighted Keys, Compact Design, Bluetooth, Keyboard, Music Rest, Sustain Foot Switch, and Built-in Speakers for Home Practice or Travel P145BT |
|
| 5 | Yamaha P225 88-Key Digital Piano with Weighted Keys, Portable Design, Keyboard, Music Rest, Sustain Foot Switch, and Built-In Speakers, Black (P225B) |
|
| 6 | Yamaha 88-Key Weighted Portable Digital Piano Keyboard with Music Rest, Sustain Foot Switch, Built-in Speakers, USB Connectivity, Black (P45B) |
|
| 7 | Roland FP-10 | Compact 88-Note Digital Piano | SuperNATURAL Piano Tones | Authentic Acoustic Feel Keyboard | Great for Beginners & Experienced Players | Bluetooth & MIDI Connectivity |
|
| 8 | STRICH 88 Key Digital Piano Foldable Full Size Electric Keyboard with Semi-Weighted Sensitive Keys, Portable Electric Piano Set for Beginner, Bundle with Sustain Pedal, Headphones, Music Rest, SEP-88F |
|
| 9 | Portable Piano Keyboard, Semi-Weighted Folding Digital Piano 88 Key, Full Size, Wood Grain, Electric Piano Keyboard w/MIDI Bluetooth, Suitable for Adult, Toddler |
|
| 10 | 61 keys keyboard piano, Electronic Digital Piano with Built-In Speaker Microphone, Sheet Stand and Power Supply, Portable piano Keyboard Gift Teaching for Beginners |
|
A DIY digital piano stand offers customized dimensions for a perfect fit, superior stability compared to many generic stands, personalized aesthetics to match your home décor, and often proves more cost-effective. It also allows for integrated features like shelves or cable management.
What kind of wood is best for building a digital piano stand?
Pine is an excellent choice for DIY stands due to its affordability, availability, and ease of workability. For greater durability and a more premium look, hardwoods like oak or maple are ideal, though they require more advanced woodworking skills and tools.
How important is stability for a digital piano stand?
Stability is extremely important. A wobbly stand can detract from your playing experience, lead to discomfort, affect your technique, and even risk damage to your instrument. A sturdy custom stand ensures your piano remains secure during intense playing.
What is the ideal height for a digital piano stand?
The ideal height places the top surface of your digital piano’s white keys at a level where your forearms are parallel to the floor and your elbows form a right angle when seated. This typically ranges from 28 to 30 inches (71-76 cm) from the floor, but it should be customized to your body and bench height.
Can I incorporate additional features like shelves or a pull-out tray into my custom stand?
Yes, a major advantage of building a custom stand is the ability to integrate additional features. Shelves for speakers, sheet music, or accessories, and even pull-out trays for a laptop or midi controller, can be incorporated into your design for enhanced functionality.
Frequently Asked Questions
What are the main benefits of a DIY digital piano stand over a store-bought one?
A DIY digital piano stand offers customized dimensions for a perfect fit, superior stability compared to many generic stands, personalized aesthetics to match your home du00e9cor, and often proves more cost-effective. It also allows for integrated features like shelves or cable management, which are typically absent in standard options.
What kind of wood is best for building a digital piano stand?
Pine is an excellent choice for DIY stands due to its affordability, wide availability, and ease of workability for beginners. For greater durability and a more premium look, hardwoods like oak or maple are ideal, though they require more advanced woodworking skills and tools for proper construction.
How important is stability for a digital piano stand?
Stability is extremely important for a digital piano stand. A wobbly stand can detract from your playing experience, lead to discomfort, negatively affect your technique, and even risk damage to your instrument. A sturdy custom stand ensures your piano remains secure during intense playing sessions, providing a solid foundation.
What is the ideal height for a digital piano stand?
The ideal height places the top surface of your digital piano's white keys at a level where your forearms are parallel to the floor and your elbows form a comfortable right angle when seated. This typically ranges from 28 to 30 inches (71-76 cm) from the floor, but it should be customized to your individual body and the height of your piano bench.
Can I incorporate additional features like shelves or a pull-out tray into my custom stand?
Yes, a major advantage of building a custom stand is the ability to integrate additional features. Shelves for speakers, sheet music, or accessories, and even pull-out trays for a laptop or MIDI controller, can be incorporated into your design for enhanced functionality and organization. This customization is difficult to achieve with off-the-shelf stands.
How to Build a Custom Digital Piano Stand
This guide outlines the steps to design and construct a personalized digital piano stand, ensuring stability, ergonomic comfort, and aesthetic integration into your home.
Accurately measure your digital piano's width, depth, and height, noting any protrusions. Determine your ideal ergonomic playing height (typically 28-30 inches for white keys). Sketch your design, including dimensions and any desired features like shelves or cable management, to create a blueprint.
Select appropriate wood (e.g., pine for budget, hardwood for durability) and necessary hardware like screws and wood glue. Based on your sketch, precisely mark and cut all lumber pieces using tools like a miter saw or circular saw. Label each piece to prevent confusion during assembly.
Construct the two main side panels (leg assemblies) by joining vertical legs with horizontal cross-supports using screws, pocket holes, or dowels and glue. Ensure squareness and stability. Then, connect these side panels with longer horizontal supports to form the main frame, determining the stand's overall width and depth.
Build a secure, flat surface for the piano to rest on, either as an integrated top frame or a separate panel of plywood. Secure this platform to the top horizontal supports. Add any planned features such as reinforcement bracing, additional shelves for accessories, cable management holes, and protective feet to the bottom of the legs.
Sand all surfaces thoroughly, starting with medium-grit (100-120) and progressing to fine-grit (180-220) sandpaper for a smooth finish. Apply your chosen finish: stain to highlight wood grain, paint for a solid color (with primer), or a clear protective coat like polyurethane for durability. Fill any visible screw holes with wood putty before finishing.
Get our weekly buyer guide
Practical specs, not advice. Unsubscribe anytime.
I’m so glad I found this! My old X-stand was driving me crazy with how much it wobbled, especially when I was really getting into a piece. Building my own stand meant I could finally get the perfect height for my playing posture, and it feels so much more solid. Plus, it looks way better in my living room than those clunky metal stands.
This was a game-changer for my practice space! I always hated how generic stands looked, and I really wanted something that blended with my home decor. Being able to tailor the stand to my instrument’s dimensions made all the difference. It’s rock-solid, and I don’t have to worry about my piano shifting around anymore.
I was skeptical about building my own stand, but the promise of better ergonomics convinced me. My back used to ache after long practice sessions with my old setup. Now, with the custom height, I can play for hours comfortably. It was a fun project, and the end result is far superior to any off-the-shelf stand I’ve seen in this price range.
The idea of a custom stand for my digital piano is great, and I appreciate the tips on stability. However, I found the process a bit more time-consuming than I anticipated. While it’s definitely more stable than my old Z-stand, I wish there were more detailed plans for different piano models. It took a lot of trial and error to get the dimensions just right for my Yamaha P-515.