Keeping your digital piano’s keys clean is crucial for a pleasant playing experience and the instrument’s longevity. Over time, keys accumulate dust, skin oils, and grime, which can dull their appearance and even affect their feel and functionality. Cleaning digital piano keys requires a gentle approach and the right products to avoid causing irreversible damage. This guide outlines safe and effective DIY methods, ensuring your keys remain pristine without risk.
Why Proper Cleaning Matters for Your Digital Piano Keys
The keys are the most interactive part of your digital piano, constantly exposed to natural oils from your fingertips, dust, and accidental spills. This accumulation not only makes the keys look unappealing but can also lead to a sticky or slippery feel, hindering performance. Critically, allowing moisture or harsh chemicals to seep into internal mechanisms can cause severe electronic damage, leading to costly repairs or rendering your instrument unusable. Proper, regular cleaning protects both the aesthetic and functional integrity of your digital piano, preserving its playability and lifespan.
Understanding Digital Piano Key Materials
Before cleaning, understand your digital piano keys’ materials, as different types react differently to various cleaning agents. Most modern digital pianos feature keys made from durable plastic, typically acrylic or ABS. Many higher-end models incorporate synthetic ivory or ebony finishes for a more realistic texture, mimicking traditional acoustic pianos. While these synthetic materials are generally resilient, they are susceptible to damage from abrasive cloths or harsh chemical cleaners. Older or antique acoustic pianos might feature real ivory keys, which are porous and much more delicate, requiring specialized care, usually from a professional conservator, and generally should not be cleaned with alcohol or strong solutions. This DIY guide focuses on the care of plastic and synthetic keys commonly found on digital pianos. For expert digital pianos reviews on this site.
Essential Cleaning Supplies
Gathering the right tools before you start will make the cleaning process smooth and effective, all while minimizing risk to your instrument.
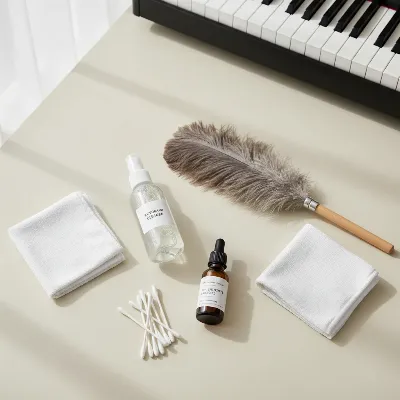
- Lint-Free Microfiber Cloths: You’ll need at least two, preferably three, white cloths. White is recommended to prevent any dye transfer to the keys, especially when damp. They are soft and highly absorbent, perfect for gentle cleaning.
- Feather Duster or Soft Artist Brush: Ideal for initial dry dusting and reaching into tight spaces between keys.
- Mild Dish Soap: A tiny drop of a gentle, unscented dish soap will be used to create a diluted cleaning solution.
- Distilled Water: Using distilled water instead of tap water can help prevent mineral residue and streaks on your keys.
- Isopropyl Alcohol (70% or less): For occasional sanitization of plastic keys, but use very sparingly and always apply to a cloth first. Note: Some manufacturers, like Yamaha, advise against alcohol for their synthetic keytops due to potential discoloration or cracking. Always check your piano’s manual if unsure.
- Cotton Swabs: Excellent for targeting stubborn spots or cleaning narrow gaps between keys without introducing too much moisture.
 A digital piano cleaning kit with microfiber cloths, a spray bottle, and a soft brush.
Step-by-Step Guide to Cleaning Digital Piano Keys
Follow these steps carefully to ensure a safe and thorough cleaning of your digital piano keys.
1. Preparation is Key
|
Our Picks for the Best Digital Piano in 2026
As an Amazon Associate I earn from qualifying purchases.
|
||
| Num | Product | Action |
|---|---|---|
| 1 | STRICH 88 Key Digital Piano Foldable Full Size Electric Keyboard with Semi-Weighted Sensitive Keys, Portable Electric Piano Set for Beginner, Bundle with Sustain Pedal, Headphones, Music Rest, SEP-88F |

|
| 2 | Yamaha P225 88-Key Digital Piano with Weighted Keys, Portable Design, Keyboard, Music Rest, Sustain Foot Switch, and Built-In Speakers, Black (P225B) |
|
| 3 | Rhymo Folding Piano Keyboard, 61 Keys Sensitive Electric Piano, Weighted Portable Electric Keyboards with Bluetooth MIDI, Digital Foldable Keyboard for Beginner (Black) |
|
| 4 | Yamaha 88-Key Weighted Portable Digital Piano Keyboard with Music Rest, Sustain Foot Switch, Built-in Speakers, USB Connectivity, Black (P45B) |
|
| 5 | Roland FP-10 | Compact 88-Note Digital Piano | SuperNATURAL Piano Tones | Authentic Acoustic Feel Keyboard | Great for Beginners & Experienced Players | Bluetooth & MIDI Connectivity |
|
| 6 | 61 keys keyboard piano, Electronic Digital Piano with Built-In Speaker Microphone, Sheet Stand and Power Supply, Portable piano Keyboard Gift Teaching for Beginners |
|
| 7 | RockJam RJ761 61 Key Keyboard Piano with Keyboard Bench, Digital Piano Stool, Sustain Pedal, Headphones & Lessons |
|
| 8 | Yamaha 88-Key Digital Piano with Weighted Keys, Compact Design, Bluetooth, Keyboard, Music Rest, Sustain Foot Switch, and Built-in Speakers for Home Practice or Travel P145BT |
|
| 9 | Portable Piano Keyboard, Semi-Weighted Folding Digital Piano 88 Key, Full Size, Wood Grain, Electric Piano Keyboard w/MIDI Bluetooth, Suitable for Adult, Toddler |
|
| 10 | Alesis Melody 61 MK4 Keyboard Piano for Beginners with 61 Keys, Speakers, Stand, Bench, Headphones, Tablet/Sheet Music Stand, 300 Sounds and Music Lessons |
|
Safety first! Before touching your piano with any cleaning supplies, turn off your digital piano and unplug it from the power source. If it runs on batteries, remove them. This prevents any electrical hazards and accidental input. Clear your workspace of any drinks, food, or other objects that could spill or interfere with the cleaning process. Ensure you have good lighting to spot all the dust and grime.
2. Gentle Dusting
Start with a dry dusting of your entire keyboard. Use a feather duster or a soft artist brush to gently sweep away loose dust and debris from the surface of the keys and the spaces in between. This crucial step prevents larger particles from scratching the keys or getting pushed further into the keybed when you introduce moisture. Always move the duster or brush towards yourself (from the back of the keys to the front) to guide debris away from the internal mechanisms.
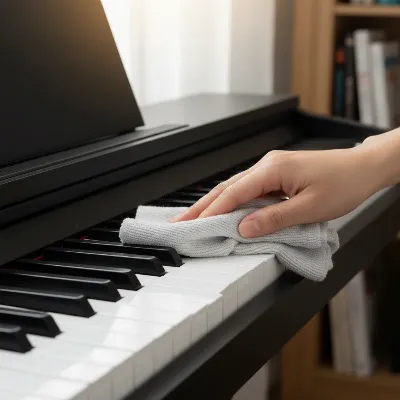
3. Damp Cloth Cleaning for Light Grime
For everyday cleaning and light grime, a mild soap and water solution is often all you need.
- Mix a tiny drop of mild dish soap into about a cup (240 ml) of distilled or lukewarm water.
- Dampen one of your microfiber cloths with this solution. Crucially, wring out the cloth thoroughly until it is barely damp and no water can drip from it. Excess moisture is the enemy of digital pianos.
- Gently wipe each key individually, moving from the back of the key towards the front (the player). Avoid wiping horizontally, as this can push dirt between the keys.
- For black keys, consider using a separate, freshly dampened white microfiber cloth to prevent any potential color transfer, although modern synthetic black keys are generally quite stable.
- Immediately follow up with a second clean, dry microfiber cloth to wipe down and buff each key. This ensures no moisture is left behind, preventing streaks and potential damage.
4. Deeper Cleaning for Stubborn Stains or Sanitization
If you encounter stubborn spots or wish to sanitize your keys (especially if multiple people use the piano), you can carefully use isopropyl alcohol.
- Dampen a cotton swab or a corner of a third clean, white microfiber cloth with 70% isopropyl alcohol. some manufacturers advise against alcohol, so proceed with caution and perhaps test on an inconspicuous area first. Avoid higher concentrations of alcohol.
- Gently rub the stained area or wipe the key. Do not soak the key or allow liquid to seep into the gaps.
- For sticky keys, isopropyl alcohol can be effective in breaking down residue. Dampen a cotton swab and gently work on the sticky area.
- Immediately wipe the key dry with a separate clean, dry microfiber cloth. Speed is essential here to minimize the alcohol’s contact time with the key surface.
 A person gently cleaning digital piano keys with a microfiber cloth and a mild solution.
5. Drying and Finishing
This is a critical step that should never be rushed. After any damp cleaning, ensure all keys are completely dry before you even consider powering your piano back on. Use a dry microfiber cloth to go over all the keys one last time, ensuring no moisture or streaks remain. A fully dry surface is essential to prevent internal damage and maintain the aesthetic quality of your keys.
What to Absolutely Avoid When Cleaning Digital Piano Keys
To protect your investment, it’s equally important to know what not to use or do when cleaning your digital piano keys.
- Harsh Chemicals: Steer clear of cleaners containing bleach, ammonia (like Windex), acetone, benzene, peroxide, chlorine, or strong degreasers. These substances can cause discoloration, cracking, dullness, or even melt certain plastics, leading to irreversible damage to your key surfaces and finish.
- Excessive Moisture or Direct Spraying: Never spray any liquid directly onto the keys or the piano’s body. Liquids can easily seep into the internal electronics, causing malfunctions or permanent damage. Always apply cleaning solutions to a cloth first, then wring it out thoroughly.
- Abrasive Materials: Avoid paper towels, rough sponges, scouring pads, or abrasive powders. These can scratch the glossy surface of your keys or wear down textured finishes, leaving permanent marks.
- Colored or Patterned Cloths: As mentioned, dyes from these cloths can transfer to your keys, especially white ones, leaving unsightly stains. Stick to white, lint-free microfiber cloths.
- Furniture Polish: While it might seem like a good idea for shine, furniture polish can leave a greasy residue that attracts dust and makes the keys slippery, hindering playability.
- Wipes Not Designed for Electronics: General household disinfectant wipes often contain harsh chemicals or too much moisture that can damage piano keys. Unless specifically formulated and tested for piano keys, avoid them.
Maintaining Your Digital Piano Keys Between Cleanings
Preventative measures can significantly reduce the frequency of deep cleaning and keep your piano looking new for longer.
- Wash Your Hands: Make it a habit to wash your hands thoroughly before playing. This reduces the transfer of skin oils, dirt, and grime to the keys.
- Cover Your Piano: When not in use, keep your digital piano covered with a dust cover or a soft, clean cloth. This simple act protects it from dust accumulation and accidental spills.
- Regular Light Dusting: A quick dry dusting with a feather duster or microfiber cloth after each playing session or at least weekly can prevent dust from building up and becoming embedded in grime.
- Keep Food and Drinks Away: Establish a strict rule: no food or drinks near the piano. Accidental spills are one of the most common causes of sticky keys and internal damage.
 A digital piano covered with a protective dust cover in a home setting.
Conclusion
Maintaining the cleanliness of your digital piano keys is a simple yet vital aspect of instrument care. By following the safe DIY cleaning methods outlined—using minimal moisture, gentle solutions, and soft cloths, and knowing what chemicals to avoid—you can effectively remove dirt and grime without risking damage. Regular maintenance, such as washing hands before playing and covering the instrument when not in use, will further ensure your digital piano remains in pristine condition, offering countless hours of enjoyable playing. A clean instrument not only looks better but also feels better to play, enhancing your musical experience for years to come.
Frequently Asked Questions
What is the safest way to clean piano keys daily?
For daily care, the safest method is a quick dry dusting with a feather duster or a soft, dry microfiber cloth. This removes loose dust before it can accumulate and become a problem.
Can I use rubbing alcohol to clean my digital piano keys?
You can use 70% isopropyl alcohol sparingly on a cotton swab or microfiber cloth for plastic keys, especially for sanitization or stubborn spots. However, always test a small, inconspicuous area first, and wipe dry immediately. Some manufacturers advise against alcohol, so check your manual.
Why should I avoid spraying liquid directly on my digital piano keys?
Spraying liquid directly on digital piano keys is strongly discouraged because moisture can seep into the sensitive internal electronic components of the instrument, leading to short circuits, corrosion, or other irreparable damage. Always apply cleaners to a cloth first.
How often should I deep clean my digital piano keys?
A mild soap and water wipe-down for light grime can be done weekly. A deeper clean with optional isopropyl alcohol for sanitization or stubborn spots might be performed monthly, depending on how frequently the piano is played and how quickly grime builds up.
What should I do if my digital piano keys feel sticky after cleaning?
If keys feel sticky after cleaning, it might be due to residual cleaning solution or too much moisture seeping into the key mechanism. Try wiping again with a barely damp cloth (distilled water only), followed immediately by a completely dry cloth. If the problem persists, it may indicate internal issues that require professional attention.
Frequently Asked Questions
What is the safest way to clean digital piano keys daily?
For daily care, the safest method is a quick dry dusting with a feather duster or a soft, dry microfiber cloth. This removes loose dust before it can accumulate and become embedded in grime, preventing potential scratches.
Can I use rubbing alcohol to clean my digital piano keys?
You can use 70% isopropyl alcohol sparingly on a cotton swab or microfiber cloth for plastic keys, especially for sanitization or stubborn spots. Always test a small, inconspicuous area first, and wipe dry immediately. Some manufacturers, like Yamaha, advise against alcohol, so check your piano's manual.
Why should I avoid spraying liquid directly on my digital piano keys?
Spraying liquid directly on digital piano keys is strongly discouraged because moisture can seep into the sensitive internal electronic components of the instrument. This can lead to short circuits, corrosion, or other irreparable damage. Always apply cleaning solutions to a cloth first and wring it out thoroughly.
How often should I deep clean my digital piano keys?
A mild soap and water wipe-down for light grime can be done weekly. A deeper clean with optional isopropyl alcohol for sanitization or stubborn spots might be performed monthly, depending on how frequently the piano is played and how quickly grime builds up from skin oils and dust.
What should I do if my digital piano keys feel sticky after cleaning?
If keys feel sticky after cleaning, it might be due to residual cleaning solution or too much moisture seeping into the key mechanism. Try wiping again with a barely damp cloth (distilled water only), followed immediately by a completely dry cloth. If the problem persists, it may indicate internal issues that require professional attention.
How to Safely Clean Digital Piano Keys
Follow these steps to safely and effectively clean your digital piano keys, removing dust and grime without causing damage.
Turn off and unplug your digital piano, removing batteries if applicable, to prevent electrical hazards. Clear your workspace of any potential spills and ensure good lighting to easily spot dust and grime on the keys.
Use a feather duster or a soft artist brush to gently sweep away loose dust and debris from the surface and between the keys. Move the duster from the back of the keys towards the front to guide debris away from internal mechanisms and prevent scratches.
Mix a tiny drop of mild dish soap into 240 ml of distilled water. Dampen a white microfiber cloth with this solution, wringing it out thoroughly until barely damp. Gently wipe each key individually from back to front, then immediately buff dry with a separate clean, dry microfiber cloth to prevent streaks and moisture damage.
For stubborn spots or sanitization, dampen a cotton swab or a corner of a third clean, white microfiber cloth with 70% isopropyl alcohol. Gently rub the stained area or wipe the key, avoiding soaking or liquid seepage. Immediately wipe the key dry with a separate clean, dry microfiber cloth to minimize alcohol contact time.
After any damp cleaning, ensure all keys are completely dry before powering your piano back on. Use a dry microfiber cloth to go over all keys one last time, ensuring no moisture or streaks remain. A fully dry surface is essential to prevent internal damage and maintain aesthetic quality.
Get our weekly buyer guide
Practical specs, not advice. Unsubscribe anytime.
I’ve always been a bit nervous about cleaning my digital piano keys, especially since I have a Roland that cost a pretty penny. This guide was super helpful! The advice about using a microfiber cloth and distilled water really made a difference. My keys feel so much smoother now, and I’m not worried about damaging the sensitive electronics.
The advice on preventing dust buildup is solid, and I appreciate the emphasis on gentle cleaning. However, I was hoping for a bit more detail on specific products for really stubborn grime. My older Casio has some yellowing that the distilled water alone didn’t quite fix. Still, it’s a good starting point for basic maintenance.
Great tips here! I used to just wipe my Yamaha keys with whatever was handy, but the part about avoiding harsh chemicals really hit home. I noticed a slight stickiness on some of my white keys, and following the steps with a mild soap solution worked wonders. It took a little longer than I expected, but the results are worth it for sure.
My Korg’s keys were starting to look pretty dull from all the practice, and I was worried about the skin oils affecting the feel. This guide was a lifesaver! The step-by-step instructions for cleaning both white and black keys separately were very clear. Now my piano looks and feels brand new, which makes playing so much more enjoyable.