Is the joy of playing your digital piano interrupted by keys that stubbornly stick, refuse to spring back, or create an annoying clicking sound? You’re not alone. Sticky keys can be incredibly frustrating, disrupting your flow and making your instrument feel less responsive. But before you panic or call for an expensive repair, know that many sticky key issues can be resolved right at home with a bit of patience and the right approach. Let’s dive into the common culprits behind this problem and empower you with effective DIY solutions, from simple surface cleaning to more advanced internal lubrication, to get your digital piano playing smoothly again.
Understanding Why Digital Piano Keys Stick
|
Our Picks for the Best Digital Piano in 2026
As an Amazon Associate I earn from qualifying purchases.
|
||
| Num | Product | Action |
|---|---|---|
| 1 | Portable Piano Keyboard, Semi-Weighted Folding Digital Piano 88 Key, Full Size, Wood Grain, Electric Piano Keyboard w/MIDI Bluetooth, Suitable for Adult, Toddler |

|
| 2 | Roland FP-10 | Compact 88-Note Digital Piano | SuperNATURAL Piano Tones | Authentic Acoustic Feel Keyboard | Great for Beginners & Experienced Players | Bluetooth & MIDI Connectivity |
|
| 3 | Yamaha P225 88-Key Digital Piano with Weighted Keys, Portable Design, Keyboard, Music Rest, Sustain Foot Switch, and Built-In Speakers, Black (P225B) |
|
| 4 | Yamaha 88-Key Weighted Portable Digital Piano Keyboard with Music Rest, Sustain Foot Switch, Built-in Speakers, USB Connectivity, Black (P45B) |
|
| 5 | Alesis Melody 61 MK4 Keyboard Piano for Beginners with 61 Keys, Speakers, Stand, Bench, Headphones, Tablet/Sheet Music Stand, 300 Sounds and Music Lessons |
|
| 6 | Yamaha 88-Key Digital Piano with Weighted Keys, Compact Design, Bluetooth, Keyboard, Music Rest, Sustain Foot Switch, and Built-in Speakers for Home Practice or Travel P145BT |
|
| 7 | RockJam RJ761 61 Key Keyboard Piano with Keyboard Bench, Digital Piano Stool, Sustain Pedal, Headphones & Lessons |
|
| 8 | 61 keys keyboard piano, Electronic Digital Piano with Built-In Speaker Microphone, Sheet Stand and Power Supply, Portable piano Keyboard Gift Teaching for Beginners |
|
| 9 | STRICH 88 Key Digital Piano Foldable Full Size Electric Keyboard with Semi-Weighted Sensitive Keys, Portable Electric Piano Set for Beginner, Bundle with Sustain Pedal, Headphones, Music Rest, SEP-88F |
|
| 10 | Rhymo Folding Piano Keyboard, 61 Keys Sensitive Electric Piano, Weighted Portable Electric Keyboards with Bluetooth MIDI, Digital Foldable Keyboard for Beginner (Black) |
|
Digital piano keys can become sticky for a variety of reasons, affecting players of all skill levels. Identifying the root cause is the first step toward a successful fix. Often, the issue stems from accumulated dust and debris that works its way between or under the keys, hindering their free movement. Everyday occurrences like spills or moisture exposure from drinks, humidity, or even excessive hand sweat can leave behind sticky residues or cause components to swell. Even the natural oils from your hands can build up over time, attracting more grime and causing keys to drag.
Beyond external factors, the internal mechanisms also play a significant role. Over years of use, the original grease applied during manufacturing can dry out, become tacky, or degrade, turning from a smooth lubricant into a sticky impediment. In some cases, foreign objects like coins, paper clips, or small pieces of food might fall into the keybed, physically blocking a key’s travel. Fluctuations in temperature and humidity can also affect key performance, especially in instruments with wood or felt components, causing them to expand or contract. Less commonly, dirty rail pins or slight key slip issues (misalignment) can also contribute to keys sticking.
Tools You’ll Need for the Fix
Before embarking on your repair journey, gather the necessary tools. Having everything at hand will make the process smoother and more efficient, whether you’re performing a quick surface clean or a more intricate internal repair.
For Surface Cleaning (No Disassembly):
- Microfiber cloth: Soft and lint-free for wiping surfaces.
- Cotton swabs: Ideal for cleaning in tight spaces between keys.
- Isopropyl alcohol (70% or less): An effective, quick-drying cleaner for residues.
- Mild soap and water: For tougher grime, used sparingly.
- Compressed air: To dislodge dust and debris from crevices.
For Advanced DIY (Disassembly Required):
- Philips head screwdriver: For most screws on the piano’s casing and internal components.
- Small flathead or triangular screwdriver/bit: May be needed for specific fasteners.
- Tweezers: Essential for carefully handling small parts like springs.
- A secure container: To keep all removed screws and small parts organized.
- New grease: While some sources suggest “any grease” or “petroleum jelly” will work, a non-migratory, plastic-safe lubricant like silicone grease or dielectric grease is generally recommended for longevity and to prevent damage to plastic components.
- Double-sided tape: If key stoppers were originally held with tape and need re-securing.
- Fine-grained sandpaper or file (optional): Only for carefully cleaning rusted or heavily soiled metal rail pins, if applicable.
- Your smartphone or camera: To take reference photos during disassembly.
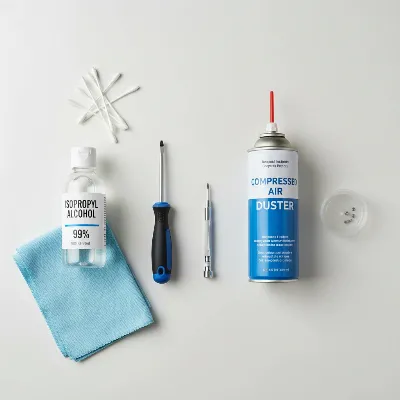 Essential tools for DIY digital piano sticky key repair including screwdrivers, alcohol, and microfiber cloth
Quick Fixes: Cleaning Digital Piano Keys (No Disassembly)
Often, a sticky key problem can be solved without having to open up your digital piano. These quick cleaning methods target surface grime and debris that can impede key movement.
- Power Off and Unplug: Safety first! Always ensure your digital piano is turned off and unplugged from the power outlet before any cleaning or repair work. This prevents electrical damage and protects you from potential shocks.
- Remove Surface Debris: Begin by taking a dry microfiber cloth and gently wiping down all the keys. This will remove loose dust and dirt. For crumbs or other debris that have fallen between the keys, use compressed air to blow them out. Direct the air away from the piano’s interior to prevent pushing debris further inside.
- Clean with Isopropyl Alcohol: Dampen a cotton swab with isopropyl alcohol (70% concentration is commonly recommended). Gently clean the sticky key, paying close attention to its sides and the gaps around it. Isopropyl alcohol evaporates quickly and is effective at dissolving sticky residues from drinks or oils. Avoid saturating the swab, as excessive moisture could seep into the keybed and cause further issues.
- Wipe with a Damp Cloth for Stubborn Residue: If the sticky residue persists, lightly dampen a clean microfiber cloth with a mild soap-and-water solution. Gently wipe the affected keys, then immediately follow up with a separate clean, dry cloth to ensure no moisture is left behind. It’s crucial that the keys are completely dry before you power the piano back on.
- Wiggle and Press for Felt Issues: Sometimes, sticky keys on both acoustic and digital pianos can be caused by compressed or swollen felt bushings. Try depressing the problematic key and gently moving it from side to side. This can help to “self-compact” the felt, potentially freeing the key’s movement.
- Consider Humidity: If you live in a humid environment, excess moisture can sometimes cause components to swell. Ensuring your piano is in a climate-controlled room or using a dehumidifier can help mitigate humidity-related sticking.
Advanced DIY: Disassembling Your Digital Piano to Fix Sticky Keys
If surface cleaning doesn’t resolve the issue, the problem likely lies within the key mechanism itself, often due to degraded grease or lodged foreign objects deep inside. This requires careful disassembly of your digital piano. A crucial word of caution: Disassembling your piano may void its warranty. Always proceed with extreme care, take plenty of photos at each step, and keep all screws and small parts meticulously organized.
- Document Everything: Before touching a single screw, take photos of your piano’s exterior from multiple angles. As you disassemble, photograph each step, paying close attention to wire connections, screw locations, and the orientation of parts. This visual record will be invaluable during reassembly.
- Unscrew the Back/Bottom Cover: Most digital pianos have a series of screws on the underside or back panel. Carefully remove all these screws and place them in your secure container. Gently lift off the cover.
- Lift the Main Cover (if applicable): Some models have an additional top cover or panel that needs to be lifted or removed to expose the keybed area.
- Unscrew Side Screws and Remove Blind/Panel: You’ll likely find screws on both sides of the internal structure that secure a “blind” or panel. Unscrew these and gently pull the panel away.
- Carefully Remove Connecting Strips: There might be flexible ribbon cables or other strips connecting the keybed to the main circuit board. Gently pull one end of each strip at a time, noting its position and orientation, as improper reattachment can lead to non-functioning keys.
- Unscrew and Separate the Keybed: The entire key assembly, often referred to as the keybed, is usually secured by several screws. Identify and remove these screws. The keybed can then be separated from the main piano chassis.
- Push Keyboard Locks: On some models, you may need to gently push a lock or tab with your thumb to fully release the keybed assembly.
- Unscrew the PCB and Lift Rubber Switches: The Printed Circuit Board (PCB) sits beneath the keys and has rubber switches on top of it. Unscrew the PCB, then carefully lift the rubber switches and their chassis.
- Remove Key Stoppers: Underneath the keys, you’ll find key stoppers, which might be held in place by double-sided tape or small clips. Carefully remove these.
- Remove the Springs of the Keys: Each key has a spring that helps it return to its original position. Using tweezers, carefully remove the springs one by one, storing them in a safe place where they won’t get lost.
- Disassemble Individual Keys: Once the springs are removed, you can disassemble the individual sticky keys. This often involves carefully wiggling them free from their pivots.
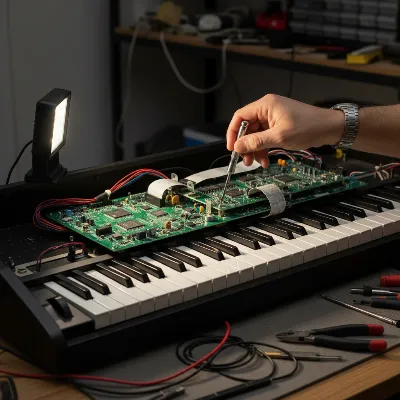 Opened digital piano showing internal components, keybed, and circuit board with a screwdriver
Cleaning and Lubricating Internal Components
With the keybed disassembled, you can now address the internal causes of stickiness. This is where most sticky key issues are resolved.
- Identify and Remove Old Grease: Look closely at the pivot points and moving parts of the keys. You’ll likely find old, sticky grease that has hardened or become gummy. This is a prime culprit for keys that don’t return smoothly or feel sluggish. Using cotton swabs dampened with isopropyl alcohol, carefully clean away all traces of this old grease from the key mechanisms and their contact points. Ensure the surfaces are completely clean and dry before proceeding.
- Clean Rail Pins: Digital piano keys often pivot on small rail pins. If these pins are dirty, rusted, or have accumulated grime, they can cause friction. Gently clean these pins with an isopropyl alcohol swab. If you notice any rust or heavy buildup that won’t come off with alcohol, you can very carefully use fine-grained sandpaper or a small file to clean the metal, but exercise extreme caution not to damage the pin or surrounding components.
- Apply New Lubricant: Once the old grease is removed and the surfaces are clean, it’s time to apply new lubricant. As suggested in some forums, “any grease” or even “petroleum jelly” might provide a temporary fix. However, for long-lasting results and to avoid potential damage to plastic, use a lubricant specifically designed for plastics and electronics, such as a high-quality silicone grease or a dielectric grease. Apply a very thin, even layer to the key’s pivot points and any other areas where plastic components glide against each other. Less is often more with lubricants; excessive application can attract dust and create new problems.
Reassembling Your Digital Piano
Reassembly is essentially the reverse of disassembly. Take your time, refer to your photos, and ensure every component is properly seated and secured.
- Reassemble the Keys: Carefully place each key back into its original position.
- Reattach the Springs: Using your tweezers, reattach the springs to each key. Make sure they are seated correctly and provide proper tension.
- Replace Key Stoppers: Position the key stoppers back in place. If they were originally secured with double-sided tape, use new tape to ensure a firm hold.
- Reinstall Rubber Switches and PCB: Carefully place the rubber switches back over their contacts on the PCB, then screw the PCB back into its position.
- Re-connect Strips: Reattach any flexible connecting strips, ensuring they are oriented correctly and fully seated in their connectors.
- Re-secure the Keybed: Screw the keybed back into the main chassis of the piano.
- Replace Side Panels/Blinds: Reinstall any side panels or blinds, securing them with their screws.
- Replace Back/Bottom Cover: Finally, replace the back or bottom cover, screwing it firmly back into place.
- Test Thoroughly: Once fully reassembled, plug in your digital piano and power it on. Test every key to ensure it moves freely, returns smoothly, and produces sound correctly. Play a few pieces to check for consistent touch response.
Preventing Sticky Keys in the Future
The best way to deal with sticky keys is to prevent them from happening in the first place. Incorporating a few simple maintenance habits can significantly extend the life and playability of your digital piano.
- Regular Cleaning: Make it a habit to regularly wipe down your piano keys with a dry microfiber cloth, especially after playing. This removes surface dust and oils before they can build up and become sticky.
- Wash Your Hands: Always wash your hands before playing. This reduces the transfer of skin oils, dirt, and food residues to the keys.
- Cover Your Piano: When not in use, cover your digital piano with a dust cover. This simple step protects it from dust accumulation, pet hair, and accidental spills.
- Manage Humidity: If you live in an area with fluctuating humidity, consider using a room humidifier or dehumidifier to maintain a stable environment. This is particularly important for digital pianos with wooden components, as extreme changes can cause swelling or contraction.
When to Call a Professional
While many sticky key issues are amenable to DIY solutions, there are times when professional intervention is necessary. If you’re uncomfortable with the idea of disassembling your digital piano, or if the problem persists after trying the cleaning and lubrication steps, it’s best to consult a qualified piano technician. Likewise, if you suspect a deeper mechanical failure, a broken component, or an issue with the circuit board, a professional will have the expertise and specialized tools to diagnose and repair the problem without causing further damage. Trying to fix complex issues without the proper knowledge can sometimes lead to more costly repairs down the line.
Conclusion
Sticky digital piano keys can transform your playing experience from enjoyable to exasperating. Fortunately, armed with the right knowledge and a bit of determination, many common causes can be effectively addressed through careful cleaning and, if necessary, internal lubrication. By understanding why keys stick and following our step-by-step guide, you can restore your digital piano’s responsiveness and enjoy a smooth, uninterrupted musical journey. Remember, regular maintenance is key to prevention, but when issues arise, a DIY approach can be incredibly rewarding. So, which of these methods will you try first to bring your beloved instrument back to its optimal playability?
Frequently Asked Questions
Can sticky keys damage a digital piano?
While mildly sticky keys are typically just an annoyance, prolonged neglect can lead to more significant issues. If excessive force is consistently applied to stuck keys, it could potentially strain or damage internal mechanisms over time, necessitating more complex and expensive repairs.
What kind of grease should I use for digital piano keys?
For lubricating digital piano key mechanisms, it’s best to use a plastic-safe lubricant. Silicone grease or dielectric grease are generally recommended as they are non-migratory and won’t harm plastic components. Some users have found success with petroleum jelly, but a specialized grease is often preferred for long-term results.
How often should I clean my digital piano keys?
For surface cleaning, it’s advisable to wipe down your keys with a microfiber cloth regularly, especially after each playing session. A more thorough surface cleaning with isopropyl alcohol or mild soap can be done every few months, or whenever you notice a buildup of grime or the start of stickiness.
Is it hard to disassemble a digital piano?
Disassembling a digital piano can range from moderately challenging to difficult, depending on the model and your DIY experience. It requires patience, careful documentation (like taking photos), and meticulous organization of parts and screws. If you are uncomfortable with intricate electronics or mechanical work, it’s best to consult a professional technician.
Can humidity cause sticky keys on a digital piano?
Yes, changes in temperature and humidity can indeed cause sticky keys on a Digital Piano. Fluctuations in moisture levels can cause certain materials, especially wood or felt components within the key mechanism, to expand or contract, leading to increased friction and keys that stick or feel sluggish.