Bringing the rich, expressive sound of your digital piano from practice sessions to a shareable recording can seem like a daunting task. However, with the right approach and a few essential tools, transforming your home into a personal recording studio is more accessible than ever. Whether you’re an aspiring composer, a dedicated student looking to track progress, or simply want to share your musical creations, understanding the fundamentals of recording your digital piano is key. This guide will walk you through the various methods, necessary equipment, and vital tips to help you achieve high-quality audio recordings right from your living room. Let’s dive into the world of capturing your musical moments.
The World of Digital Piano Recording: Why and How
Digital pianos offer a fantastic blend of traditional piano feel with modern versatility, including the ability to easily record your performances. Unlike acoustic pianos, which require careful microphone placement and acoustically treated rooms to capture their nuanced sound, digital pianos provide direct audio outputs, simplifying the recording process significantly. This direct connection minimizes external noise and ensures a clean signal. Recording allows you to listen critically to your playing, compose and arrange music, create demos, or simply preserve your musical journey. It opens up a new dimension of creativity and self-improvement for any digital piano owner.
Key Recording Methods for Your Digital Piano
|
Our Picks for the Best Digital Piano in 2026
As an Amazon Associate I earn from qualifying purchases.
|
||
| Num | Product | Action |
|---|---|---|
| 1 | Alesis Melody 61 MK4 Keyboard Piano for Beginners with 61 Keys, Speakers, Stand, Bench, Headphones, Tablet/Sheet Music Stand, 300 Sounds and Music Lessons |

|
| 2 | Portable Piano Keyboard, Semi-Weighted Folding Digital Piano 88 Key, Full Size, Wood Grain, Electric Piano Keyboard w/MIDI Bluetooth, Suitable for Adult, Toddler |
|
| 3 | Yamaha P225 88-Key Digital Piano with Weighted Keys, Portable Design, Keyboard, Music Rest, Sustain Foot Switch, and Built-In Speakers, Black (P225B) |
|
| 4 | Rhymo Folding Piano Keyboard, 61 Keys Sensitive Electric Piano, Weighted Portable Electric Keyboards with Bluetooth MIDI, Digital Foldable Keyboard for Beginner (Black) |
|
| 5 | STRICH 88 Key Digital Piano Foldable Full Size Electric Keyboard with Semi-Weighted Sensitive Keys, Portable Electric Piano Set for Beginner, Bundle with Sustain Pedal, Headphones, Music Rest, SEP-88F |
|
| 6 | RockJam RJ761 61 Key Keyboard Piano with Keyboard Bench, Digital Piano Stool, Sustain Pedal, Headphones & Lessons |
|
| 7 | Yamaha 88-Key Weighted Portable Digital Piano Keyboard with Music Rest, Sustain Foot Switch, Built-in Speakers, USB Connectivity, Black (P45B) |
|
| 8 | Yamaha 88-Key Digital Piano with Weighted Keys, Compact Design, Bluetooth, Keyboard, Music Rest, Sustain Foot Switch, and Built-in Speakers for Home Practice or Travel P145BT |
|
| 9 | 61 keys keyboard piano, Electronic Digital Piano with Built-In Speaker Microphone, Sheet Stand and Power Supply, Portable piano Keyboard Gift Teaching for Beginners |
|
| 10 | Roland FP-10 | Compact 88-Note Digital Piano | SuperNATURAL Piano Tones | Authentic Acoustic Feel Keyboard | Great for Beginners & Experienced Players | Bluetooth & MIDI Connectivity |
|
There are several effective ways to record audio from your digital piano, each with its own benefits and suitable for different needs and budgets. Understanding these methods is the first step toward choosing the right path for your recording endeavors. For expert digital pianos reviews on this site.
USB Audio Recording
Many modern digital pianos come equipped with a “USB to Host” port, which can transmit both MIDI data and, in some cases, stereo audio directly to your computer. This method is often the simplest for beginners, requiring minimal additional hardware.
- How it works: You connect a standard USB cable from your digital piano to your computer. Your computer recognizes the piano as an audio input device, allowing you to record the piano’s internal sounds directly into a Digital Audio Workstation (DAW) or other recording software.
- Pros: Very straightforward setup, often requires just one cable, minimizes interference, and can be very affordable if your piano supports it.
- Cons: Not all digital pianos offer USB audio capabilities; some only transmit MIDI via USB. The audio quality might be limited by the piano’s internal digital-to-analog converters (DACs).
- Ideal for: Beginners, those with compatible pianos, and anyone looking for a simple, direct recording solution.
Audio Interface Recording (Analog)
This is arguably the most common and versatile method for achieving high-quality recordings. An audio interface is an external device that converts the analog audio signal from your piano into a digital signal that your computer can understand.
- How it works: You connect the analog audio outputs (typically 1/4-inch jacks labeled “Line Out,” “L/Mono,” and “R”) of your digital piano to the inputs of the audio interface using instrument cables. The audio interface then connects to your computer via USB, Thunderbolt, or FireWire. Your DAW recognizes the audio interface as its input device.
- Pros: Offers superior sound quality, low latency, greater control over input levels, and often includes phantom power for condenser microphones (though not needed for digital piano direct recording). Allows for stereo recording with separate left and right channels, preserving the instrument’s spatial depth.
- Cons: Requires additional hardware (audio interface and cables), which adds to the cost and complexity.
- Ideal for: Musicians seeking professional-grade audio, those who want to record other instruments or vocals, and individuals looking for flexibility and expandability in their home studio.
Direct Recording to a Portable Recorder
For musicians who prefer to record without a computer or need maximum portability, a dedicated portable audio recorder is an excellent option. These handheld devices can capture high-quality audio directly.
- How it works: You connect the line outputs of your digital piano directly to the inputs of the portable recorder using appropriate cables. You set levels on the recorder, press record, and your performance is saved to an SD card.
- Pros: Extremely portable, no computer needed, quick setup, good for practice and capturing ideas on the go.
- Cons: Limited editing capabilities compared to a DAW, transfer to a computer is often necessary for further production, might have fewer input options than an audio interface.
- Ideal for: Recording practice sessions, capturing impromptu ideas, field recording, or musicians who prefer a standalone solution.
Essential Equipment for Home Digital Piano Recording
Regardless of the method you choose, a few pieces of equipment are consistently crucial for a successful recording setup.
- Digital Piano: The obvious centerpiece. Ensure you know where its audio outputs (Line Out, USB Audio) are located. Consult your manual if unsure. If only a headphone output is available, you can use it, but line-level outputs generally provide a cleaner signal.
- Cables:
- USB Cable: For USB audio/MIDI connections. A standard A-to-B USB cable is often used.
- Instrument Cables (TS/TRS): 1/4-inch cables are used to connect your piano’s line outputs to an audio interface. For stereo recording, you’ll need two cables (left and right).
- RCA or 3.5mm Adapters: If your piano or recording device uses different jack sizes, you might need adapters (e.g., 1/4-inch to 3.5mm for headphone outputs).
- Audio Interface: (Required for analog recording) This device is fundamental for converting your piano’s analog signal into a digital one for your computer. Look for interfaces with at least two inputs (for stereo recording), good preamps, and a stable connection type (USB 2.0/3.0, Thunderbolt). Popular brands include Focusrite, PreSonus, Behringer, and Universal Audio.
- Computer or Mobile Device: A reliable computer (Mac or PC) or a powerful tablet/smartphone with sufficient processing power and storage is essential to run your recording software.
- Headphones/Studio Monitors: Critical for accurate monitoring of your sound during recording and mixing. Avoid consumer-grade headphones, which can color the sound; opt for studio headphones or monitors for a flat frequency response.
- Portable Recorder: (Optional, for direct recording method) Devices like Zoom H-series or Tascam Recorders offer high-quality standalone recording.
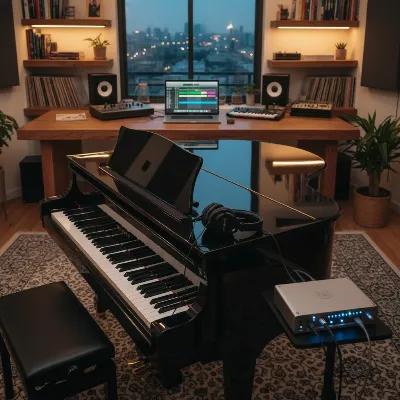 A home studio setup with a digital piano, audio interface, and computer, showing cables connected.
Software to Transform Your Digital Piano Recordings
Once you have your hardware connected, you’ll need software to capture, edit, and mix your audio. These programs are often referred to as Digital Audio Workstations (DAWs).
- Digital Audio Workstations (DAWs): These are comprehensive software packages for recording, editing, mixing, and mastering audio.
- Free Options:
- Audacity: A free, open-source audio editor and recorder for Mac, Windows, and Linux. Excellent for basic audio recording and editing.
- GarageBand: Included with macOS, offering a user-friendly interface for recording audio and MIDI, with a library of virtual instruments.
- Cakewalk by BandLab: A free, professional-grade DAW for Windows users.
- Paid/Professional Options:
- Logic Pro X (Mac): A powerful and feature-rich DAW, a common choice for Mac users.
- Ableton Live: Popular for electronic music production but versatile for all genres.
- Reaper: A highly customizable and affordable DAW with a generous trial period.
- Pro Tools: Industry standard in many professional studios.
- FL Studio: Popular among beatmakers and electronic music producers.
- Free Options:
- MIDI Software/Virtual Instruments: If your digital piano transmits MIDI, you can record the MIDI data into a DAW. This data can then trigger virtual instrument plugins (VSTi/AU) within your DAW, allowing you to change the piano sound or even use orchestral sounds after the performance has been recorded.
Step-by-Step Guide: Recording Your Digital Piano
Let’s break down the recording process for the two most common methods.
Method 1: USB Audio Recording
- Check Piano Compatibility: First, verify if your digital piano supports USB audio output in its manual. If it only supports USB MIDI, you’ll need to use the audio interface method or a virtual instrument.
- Connect Your Piano: Use a standard USB A-to-B cable to connect the “USB to Host” port on your digital piano to a USB port on your computer.
- Install Drivers (if necessary): Your computer might automatically recognize the piano, but some manufacturers require specific drivers. Check your piano’s support website.
- Configure Your DAW:
- Open your chosen DAW (e.g., Audacity, GarageBand).
- Go to your DAW’s preferences or settings (often under “Audio Setup” or “Input/Output”).
- Select your digital piano as the audio input device.
- Create a new stereo audio track in your DAW.
- Set Levels: Play your piano at your loudest desired volume. In your DAW, monitor the input level meter. Adjust the piano’s master volume or the track’s input gain in the DAW so that the signal is strong but does not “clip” (go into the red). Aim for peaks around -6dB to -3dB.
- Record and Monitor: Put on your headphones. Press the record button in your DAW and start playing. Listen for any latency (delay between playing and hearing the sound). If latency is an issue, try adjusting your DAW’s buffer size settings (lower buffer size reduces latency but requires more processing power).
- Save and Export: Once recorded, you can edit your performance (trim, normalize, add effects). Save your project, and then export the track as a high-quality audio file (e.g., WAV or AIFF) for maximum fidelity, or MP3 for smaller file sizes.
Method 2: Audio Interface Recording
- Connect Your Piano to the Interface: Use two 1/4-inch instrument cables. Connect the “L/Mono” output of your digital piano to input 1 on your audio interface, and the “R” output to input 2. If your piano only has a single mono output, use one cable for input 1.
- Connect Interface to Computer: Connect your audio interface to your computer using the appropriate cable (USB, Thunderbolt).
- Install Drivers: Install any necessary drivers for your audio interface from the manufacturer’s website.
- Configure Your DAW:
- Open your DAW.
- Go to your DAW’s preferences or settings.
- Select your audio interface as both the input and output device.
- Create a new stereo audio track in your DAW (or two mono tracks panned left and right for stereo recording).
- Set Levels: Play your piano at your loudest. On your audio interface, adjust the gain knobs for inputs 1 and 2 until the input meters are strong but not clipping. Again, aim for peaks around -6dB to -3dB in your DAW.
- Record and Monitor: Use headphones connected to your audio interface for direct monitoring, which often provides zero-latency playback. Press record in your DAW and start playing.
- Save and Export: Edit your recording, save your project, and export your final audio file.
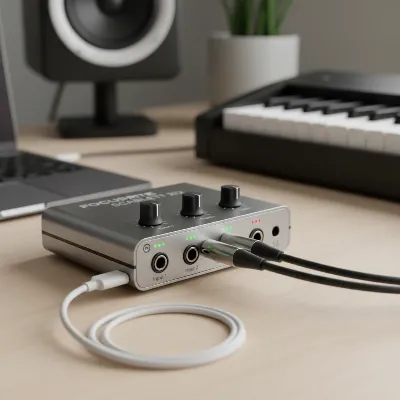 A close-up of an audio interface connected to a digital piano with cables, showing input levels.
Optimizing Your Digital Piano Recordings: Tips for Quality
Achieving professional-sounding recordings goes beyond just connecting cables. Here are some tips to enhance the quality of your digital piano tracks.
- Set Levels Correctly (Gain Staging): This is crucial. Ensure your piano’s output volume and your audio interface’s gain (or DAW input gain) are set so that the signal is robust but never clips. Clipping leads to irreversible distortion.
- Record in Stereo: Whenever possible, record your digital piano in stereo (using both L and R outputs). This captures the instrument’s full spaciousness and richness, especially important for piano sounds with natural reverb or stereo effects.
- Monitor Your Sound Accurately: Use good quality studio headphones or flat-response studio monitors for critical listening. This allows you to hear exactly what is being recorded without coloration.
- Minimize Background Noise: Even though you’re recording direct, ensure your environment is quiet. Turn off fans, air conditioners, or anything that could introduce ambient noise that might be picked up by an open microphone (if you’re also recording vocals) or simply be distracting.
- Edit and Mix Basics:
- Trim: Remove any unwanted silence or noise at the beginning and end of your recording.
- Normalize: If your recording is too quiet overall, normalization can boost the entire track to a healthier level without clipping the loudest parts.
- EQ (Equalization): Use EQ to subtly shape the tone of your piano. For example, a slight boost in the highs can add sparkle, while a gentle cut in the low-mids can reduce muddiness.
- Compression: Compression helps to even out the dynamics, making quiet parts louder and loud parts quieter, resulting in a more consistent sound. Use it subtly for piano.
- Reverb: A touch of reverb can add space and realism to your piano sound, simulating an acoustic environment. Many digital pianos have built-in reverb, but DAW plugins can offer more control.
- Export Settings: When exporting your final track, choose a high-quality format like WAV or AIFF for distribution or archiving if file size isn’t an issue. For streaming or sharing, a high-bitrate MP3 (e.g., 320 kbps) is generally sufficient. Match the sample rate (e.g., 44.1 kHz or 48 kHz) and bit depth (e.g., 16-bit or 24-bit) that you recorded in.
Troubleshooting Common Digital Piano Recording Issues
Encountering problems during recording can be frustrating, but many common issues have simple solutions.
- No Sound or Low Volume:
- Check all cable connections to ensure they are secure.
- Verify input/output selections in your DAW preferences.
- Check volume levels on your digital piano, audio interface, and within your DAW.
- Ensure any necessary drivers for your audio interface or USB piano are installed and up to date.
- Latency Problems (Delay in Sound):
- Lower your DAW’s buffer size setting. This reduces the time it takes for your computer to process audio, but too low can cause crackling. Find a balance.
- Ensure your audio interface drivers are correctly installed and selected.
- Use direct monitoring if your audio interface supports it (listening to the input directly from the interface, bypassing the computer).
- Distortion or Clipping:
- Your input levels are too high. Reduce the master volume on your digital piano or the gain knobs on your audio interface/DAW input until the meters are no longer in the red.
- Driver Issues:
- Always download the latest drivers directly from the manufacturer’s website for both your digital piano (if it has USB audio) and your audio interface. Outdated or incorrect drivers are a frequent cause of problems.
Conclusion
Recording your digital piano at home is an incredibly rewarding endeavor that enhances your musical journey and allows you to share your passion with the world. By understanding the different recording methods—from the simplicity of USB audio to the professional quality of an audio interface—you can choose the setup that best suits your needs and budget. Remember to focus on clean signal levels, proper cable connections, and accurate monitoring to ensure high-quality results. With a little patience and experimentation with your DAW, you’ll be capturing stunning performances and exploring new creative possibilities with your digital piano in no time. So, what musical masterpiece will you record first?
Frequently Asked Questions
What is the difference between MIDI and audio recording for a digital piano?
Audio recording captures the actual sound your digital piano makes, including its tone, dynamics, and any effects. MIDI (Musical Instrument Digital Interface) recording, on the other hand, only captures data about your performance, such as which notes were played, how hard, and for how long. MIDI doesn’t contain sound itself but can be used to trigger virtual instruments or the piano’s internal sounds.
Can I record my digital piano directly to my phone or tablet?
Yes, it’s often possible. Many audio interfaces are compatible with iOS and Android devices, typically requiring an adapter (like Apple’s Camera Connection Kit for iPhones/iPads). Some digital pianos with USB audio might also connect directly. You’ll need a recording app on your device, such as GarageBand (iOS) or various third-party DAWs available.
Do I need special cables to record my digital piano?
For analog recording via an audio interface, you’ll typically need two 1/4-inch TS (Tip/Sleeve) instrument cables for stereo output. If your piano has a USB to Host port and supports USB audio, a standard USB A-to-B cable is usually sufficient. Always check your piano’s manual for recommended cable types.
How can I reduce background noise when recording my digital piano?
Since you’re recording direct from the piano’s line outputs, ambient room noise is less of an issue than with microphones. However, ensure your electrical connections are clean to avoid hums or buzzes. Use shielded cables, and if possible, plug your equipment into a surge protector or power conditioner. Close windows and turn off noisy appliances if you’re also recording vocals with a microphone.
What is latency, and how can I fix it when recording?
Latency is the delay between when you play a note on your digital piano and when you hear it back through your computer/headphones. It’s caused by the time it takes for your computer to process the audio. You can reduce latency by lowering the “buffer size” in your DAW’s audio settings. Using a dedicated audio interface with good drivers also significantly helps minimize latency.
Is it better to record my digital piano in mono or stereo?
For most digital pianos, recording in stereo (using both left and right outputs) is highly recommended. This captures the full breadth and depth of the instrument’s sound, including any stereo effects or reverb, resulting in a richer, more immersive recording. Only record in mono if you have specific creative reasons or limited inputs.
Can I use the headphone jack of my digital piano for recording?
Yes, you can use the headphone jack for recording if your digital piano doesn’t have dedicated line outputs. However, dedicated line outputs generally provide a cleaner, stronger signal without the headphone amplifier’s coloration. You’ll likely need a 1/4-inch to 3.5mm adapter to connect the headphone output to your recording device’s input.
Get our weekly buyer guide
Practical specs, not advice. Unsubscribe anytime.